Thoughts…
There are 2.93 billion Facebook users out there. That’s double the population of China.
We spend an average of 33 minutes on Facebook per day. That’s double the time you could spend to save 15% or more on your car insurance.
But I digress.
Between its widespread usage, versatility, targeting, and low costs, it’s not surprising that 66% of U.S. small businesses use Facebook ads.
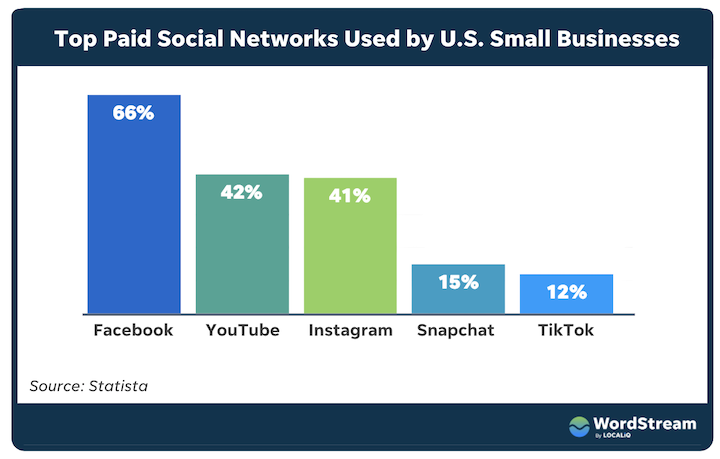
So in this post, I’m going to walk you through a full tutorial on how to advertise on Facebook, complete with screenshots, tips, FAQs, and visuals.
Table of contents
Why advertise on Facebook?
If you’re reading this post, chances are you’ve already made up your mind as to whether you should advertise on Facebook. But in case you’re still on the fence, here are some reasons:
- Build brand awareness. Unlike Google ads which are all text, Facebook ads allow you to use images and video which can support your branding. And while purchase intent is not as high on Facebook as on Google, imagery gives you the power to stand out in users’ feeds through emotional marketing.
- Cost-effective. Because Facebook ads offer such specific targeting, you can rest assured that you’re making the most of your ad budget.
- Versatility. Between the wide range of ad formats and the different objectives available, you can use Facebook ads to target users at every stage of your marketing funnel.
- Gain audience insights. People spend a lot of time on Facebook and use it for a number of reasons in their day-to-day. The data you collect through Facebook ads provides invaluable customer insights you can use to inform your strategy elsewhere.
And if that’s not enough, here are some numbers for ya:
- 66% of small businesses in the U.S. use Facebook advertising.
- The average Facebook user clicks on 11 ads per month
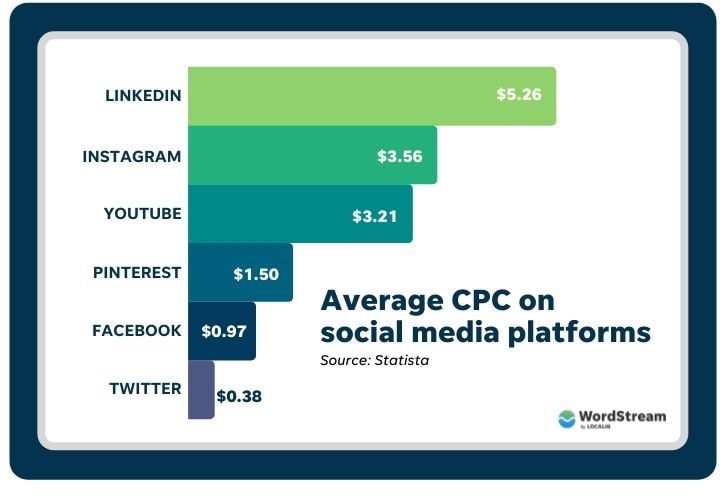
- Facebook ads have the lowest average cost per click of all social media advertising platforms.
Facebook ad account overview
When you run Google Ads, you set up a Google Ads account and then off you go, but with Facebook, there are several different properties involved. If you’re new to Facebook advertising, you’re highly susceptible to falling into a black hole of confusion surrounding which accounts you need.
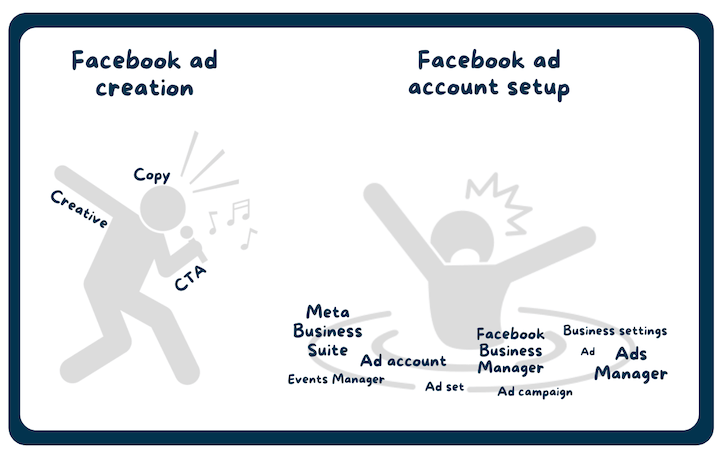
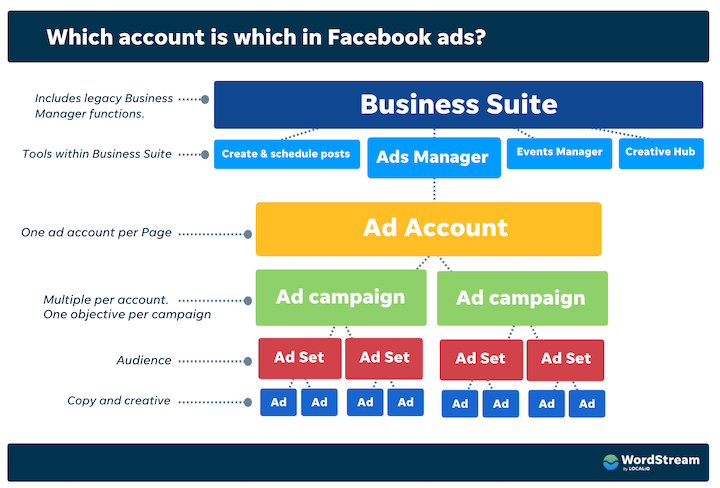
Here’s the breakdown (and don’t worry, I’m going to walk you through setting up all of these):
- Meta Business Suite (formerly Facebook Business Suite) is the umbrella account that encompasses everything. It’s a free account where you can manage your Facebook and Instagram accounts in one place. You can create and schedule posts, reply to messages, get insights and notifications, and more.
- Business Manager is now one and the same with Business Suite. It used to be the backend where you manage permissions, payments, pixels, and more things that don’t begin with a P. All of these functions are now a part of Meta Business Suite, but if you really want to perform them out of the old Business Manager interface, you can go down to the help button and click Switch to Business Manager.
- Ads Manager. This is where your ad account(s) live. If you’re an agency, you will have multiple ad accounts in one Ads Manager account. If you’re the only one managing your properties, you don’t need a Meta Business Suites/Business Manager account to use Ads Manager, but it is recommended (and it’s free, so it can’t hurt).
- Ad account. This is what you create within Ads Manager. You should only have one ad account per business (or per Facebook business Page)
Quick halftime break. Here, have some orange slices 🍊 and water 💧
- Facebook Page. You need a Facebook Page in order to advertise on Facebook, but you don’t need to be advertising on Facebook in order to create a Page. In fact, this is a staple in any organic social media marketing strategy. You can create a Page entirely separate from all of the above, right from your Facebook profile. Or you can create one out of Business Suite.
- Ad campaign. This is where you choose an objective. You can (and should) have multiple campaign types within one ad account.
- Ad set. This refers to the audience you’re targeting—such as by demographics, interests, age, and more. You can have multiple ad sets in one campaign.
- Ad. This is your actual copy and creative. You’ll want to have at least two ads per ad set. We’ll talk more about Facebook ad account structure later on.
How to advertise on Facebook
Alright, now that we have the visual map to an actual Facebook ad, grab your charger and buckle up because it’s time for us to hit the road. Here are the steps that we’ll be covering:
- Create a Business Suite account
- Connect or create your Facebook Page
- Create your ad account
- Add the pixel to your website
- Create your Facebook ad campaign
- Create your Facebook ad set
- Create your ad
- Publish
1. Create a Business Suite account
As mentioned above, Business Manager and Business Suite are now merged into one. When you create a Business Manager Account, you will be brought into the Meta Business Suite interface. You can access the old Business Manager interface (by clicking Help > Switch to Business Suite) but your best bet is to get familiar with Business Suite since this is here to stay.
To create an account, go to business.facebook.com and click “Create account” on the upper right.
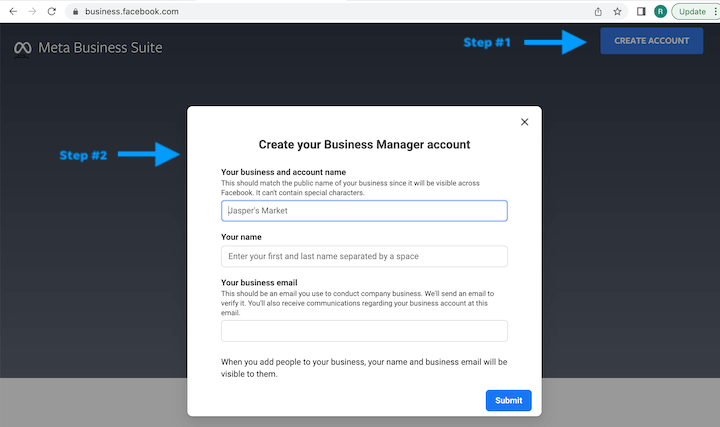
You’ll be asked to add your business name, your name, and then your business email. Upon confirming your email, your account will be set up.
Here is where you’ll be brought to the Meta Business Suite interface.
2. Connect or create your Facebook Page
Head down to the bottom left and click on Settings.
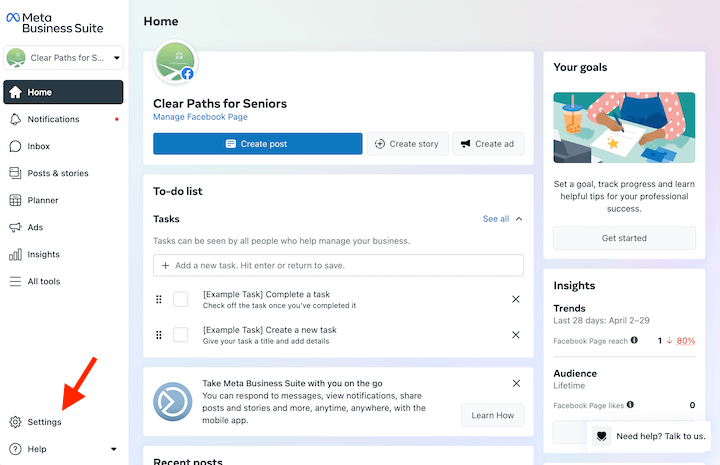
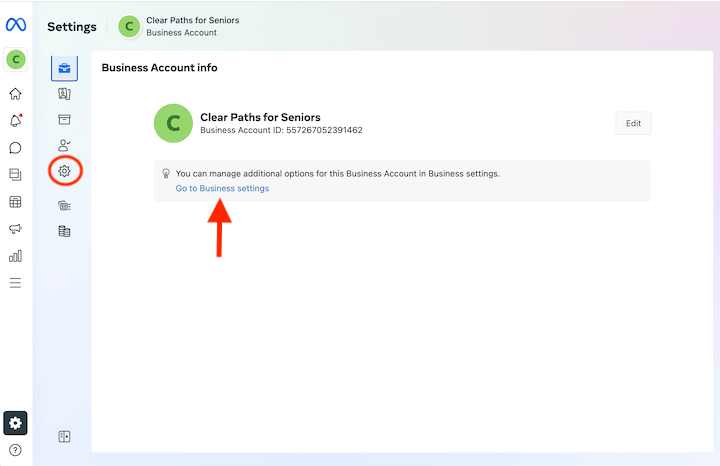
From there, click the second gear you see, or you might see a prompt to go to Business Settings. Both take you to the same place. Business settings is basically the legacy Business Manager.
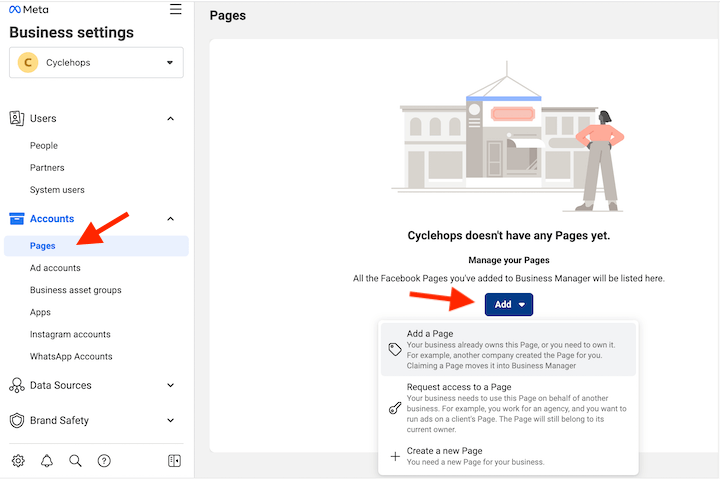
You need a Facebook Page in order to advertise. On the left window, select Pages and then click Add. Here you can either add an existing Page, create a new Page, or request access to a Page (such as if you’re running ads for another business).
While you can supply the bare minimum just to get your page created, it’s best to build it out fully before you start advertising since users can navigate to your Page from your ad. Use our guide to creating a Facebook Business Page to set your page up in full and optimize it for marketing purposes.
3. Create your ad account
Okay now navigate back to Ad accounts in that left-hand pane. You’ll see an option on the right to create a new ad account.
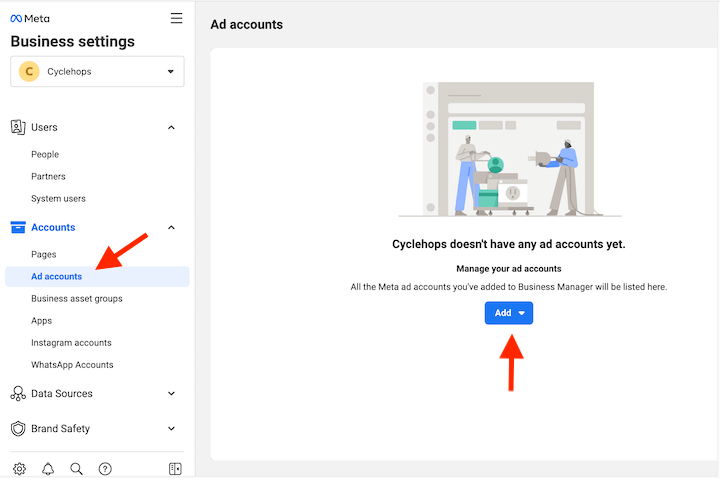
Provide your Ad account name, time zone, and currency then click Next. Facebook will then ask you whether the ad account is going to be used to manage ads for the business account through which you’ve created this ad account or for another business or client.
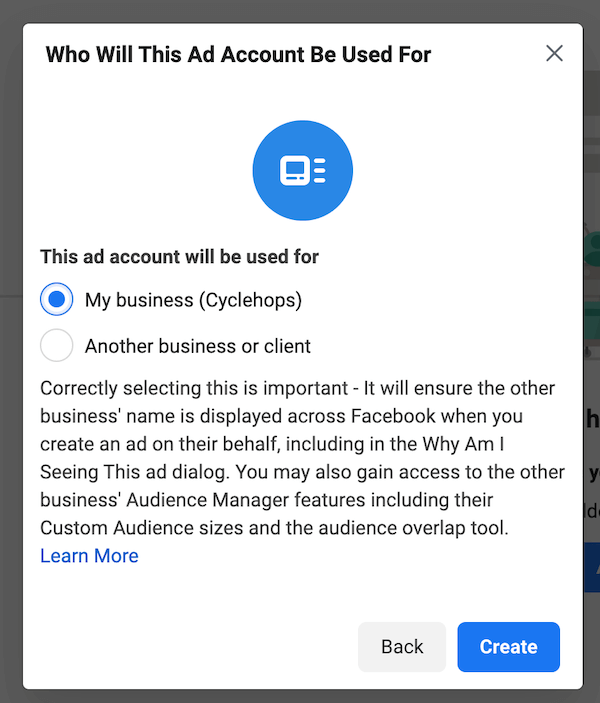
Next you’ll be asked to add people and permissions. Select your name and give yourself full control over everything.
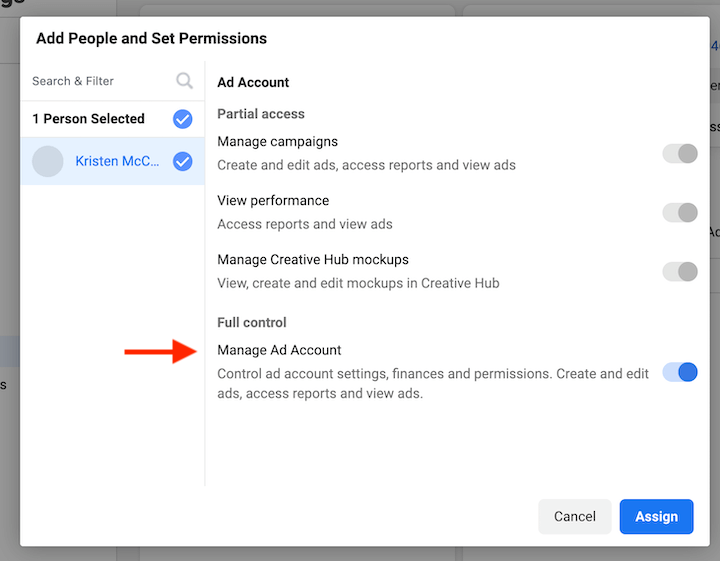
Click Assign and then click Add Payment Info. Now you have an ad account set up.
4. Add the pixel to your website
You don’t have to do this step now, but you’re going to have to do it eventually, so may as well get it over with! The pixel is a little snippet of code that will tell you what your ad viewers do once they land on your website. Insights from the pixel help you to further optimize your ads as well as create Facebook retargeting audiences which tend to perform well.
Note! With iOS privacy updates and the eventual end of third-party cookies, we highly recommend you set up the Facebook Conversions API as well, as this is the best way to get the most complete picture of your data possible.
To set up the pixel, go to Data Sources, select Pixels, and on the right, click Add.
Facebook will ask you whether you want to install it manually or using a partner integration.
![]()
The partner integration methods are designed to make the process easier without using code, so I’d encourage you to go that route first. Current partners include:
- WordPress
- WooCommerce
- Tealium
- Shopify
- Makeshop
- Magento
- Google Tag Manager
- Conversions API Gateway
- Cafe24
- Zapier
- Segment
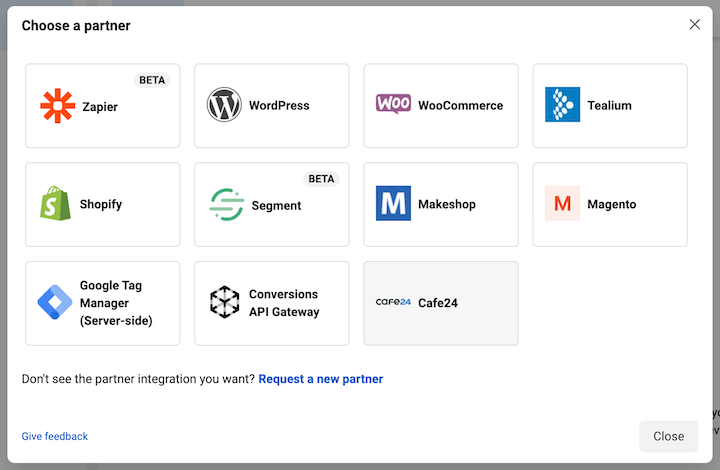
If the partner integration method doesn’t work or you don’t use any of those platforms, this video tutorial on setting up the Facebook pixel manually from Ivan Manna is super helpful.
Set up your web events
As part of the pixel setup process, you’ll have to verify your domain and configure your web events (Aggregated Event Measurement). Paid Media Pros offers an easy tutorial video for configuring your web events.
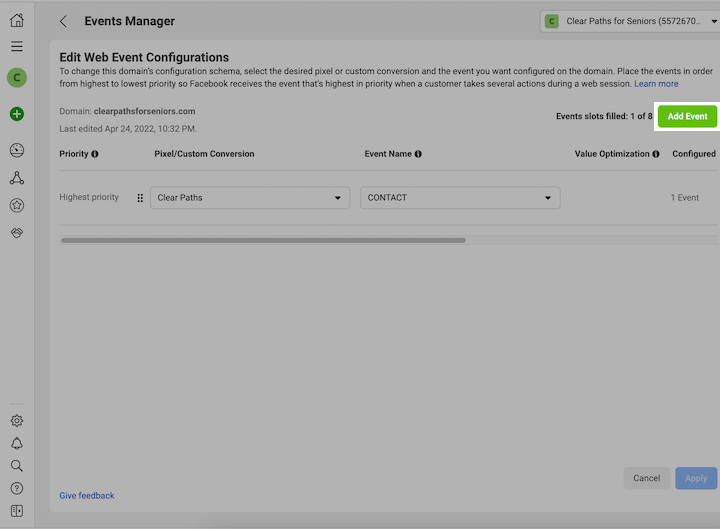
Note that you can always revisit the domain verification process by going to Brand Safety > Domains, and revisit the event setup process by going to Events Manager.
5. Create your Facebook ad campaign
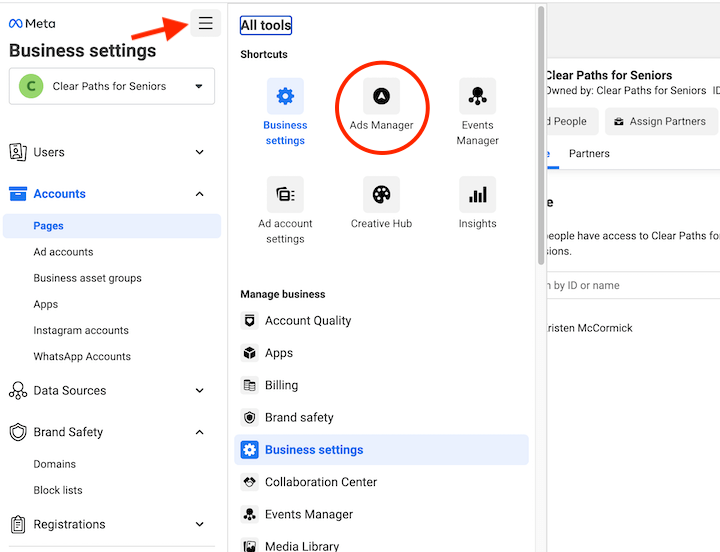
Now click the hamburger menu at the top left (All tools) and select Ads Manager.
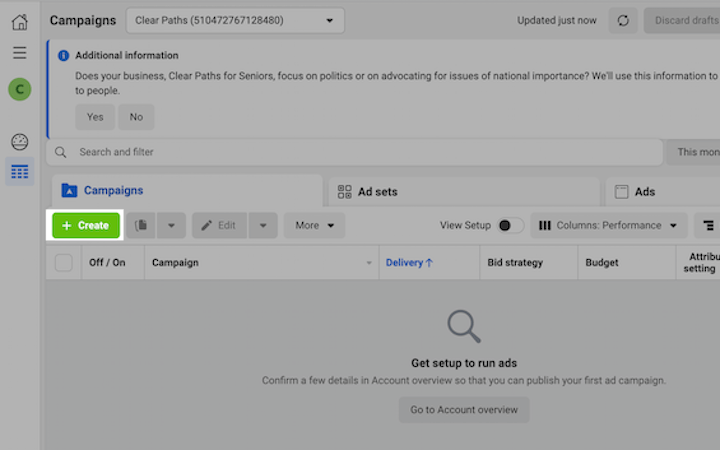
On the left, select “Create.”
Choose your campaign objective
Facebook offers three categories of campaign objectives: Awareness, Consideration, and Conversion.
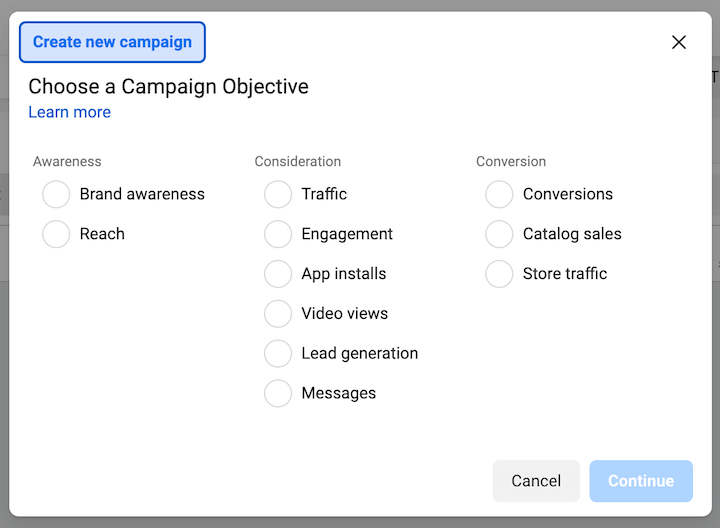
- Awareness
- Consideration
- Traffic
- Engagement
- App installs
- Video views
- Lead generation
- Messages
- Conversions
- Catalog sales
- Store traffic
In terms of which objective to choose, it will depend on what your offer is and who you’re targeting. Ultimately, you want to have a full-funnel Facebook ad strategy where you create different campaigns for each stage of your funnel, but for help choosing which objective is best for this particular campaign, this chart may help:
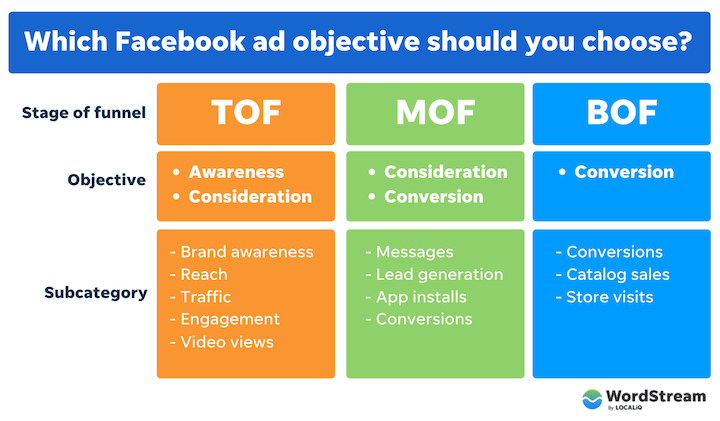
Note that if you choose a conversions campaign, you definitely need to have your pixel set up and web events configured.
Campaign settings
Once you select your objective, you’ll see something like this:
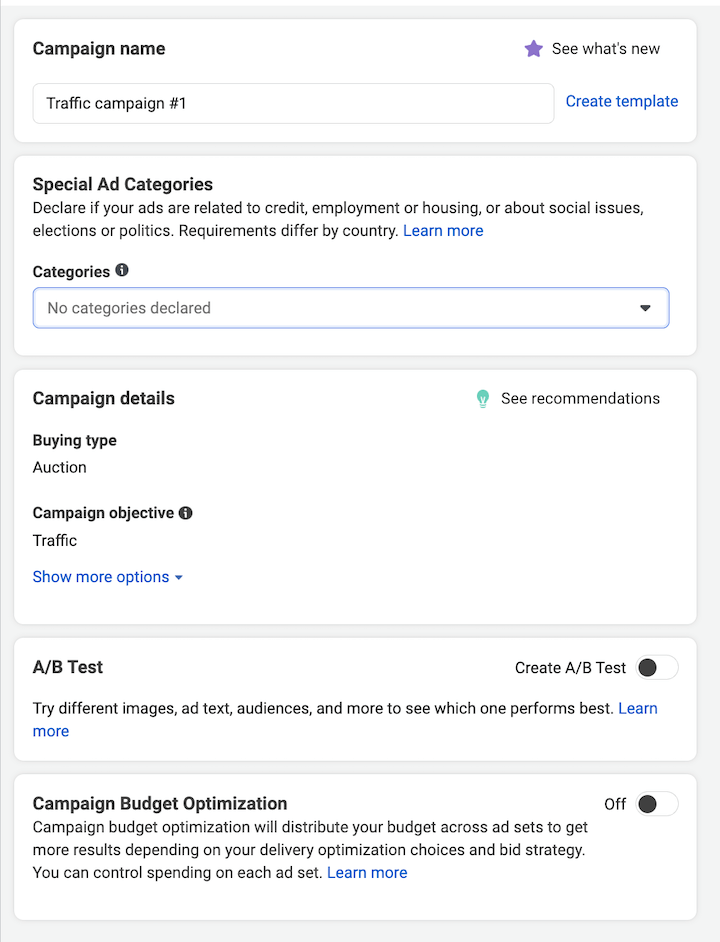
- Campaign name: Use whatever you want, as long as it makes sense to you.
- Special Ad Categories: If you fall into any of those special categories, declare that here so you can take care of any further documentation you may need to provide, depending on Facebook advertising policies.
- Campaign details: Here you can change your objective if you need to, and you can also select a campaign spending limit (if you go with a daily budget—more on budgets in a bit).
- A/B test: We’re going to skip this for now, but you can learn more in our guide to Facebook A/B testing.
- Campaign Budget Optimization: With this setting turned on, instead of choosing your budget separately for each ad set within a campaign, Facebook will decide which ad sets should receive a higher percentage of the spend based on performance. You can leave this off for now, but if you want to learn more, we talk about the pros and cons of CBO here.
6. Create your Facebook ad set
Now we’re in the ad set stage. There are more features and settings here too, but here’s what matters.
- Traffic: Choose where you want to drive traffic. This is because I chose a traffic campaign for my objective, but this window may look different for different objectives.
- Dynamic creative. Facebook dynamic ads operate similar to responsive search ads, where you provide the assets (images, videos, headlines, descriptions, etc.) and Facebook will mix and match them into different combinations. For simplicity’s sake, I will not opt into this setting.
- Optimization & delivery. This is where you tell the algorithm what you see as success for your ad set so that Facebook can further refine who it shows your ads to.
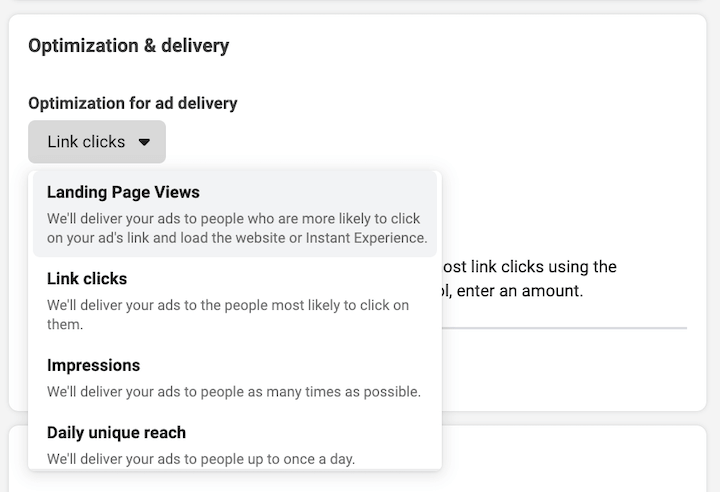
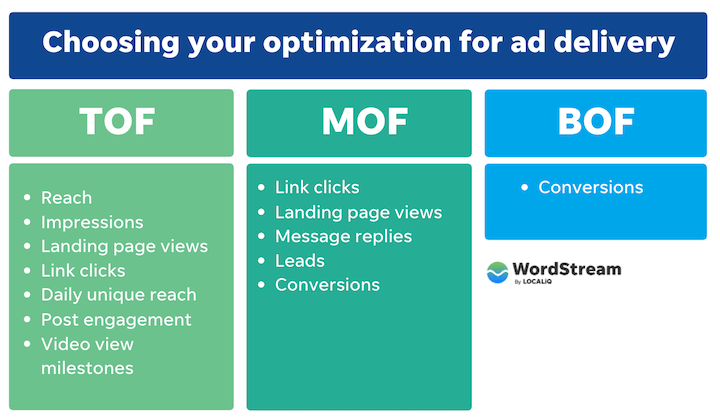
The options here will vary depending on your campaign objective, but here is a quick guide on how to choose:
Budget & schedule
Here is where you choose a daily budget or lifetime budget. You can learn about daily vs lifetime budgets here, but in general
Choose daily budgets when:
- Your campaign will be evergreen
- You want to maximize strong performance
- You expect to change your budget regularly
Choose lifetime budgets when:
- You need to run your ads on a schedule
- Your campaign has a set budget and end date
If you go with a daily budget, it’s best to start with something like $5-$10 a day. If you set it too low, your ad may not compete as well, meaning it will show less and not collect enough data for Facebook to further optimize for the best results. More on that in this list of Facebook advertising mistakes.
You also have the option here to set up your ad scheduling which is fairly easy on Facebook. You can tell Facebook to only run your ads when it makes sense for your business (such as only during your operating hours) or audience (such as only running your breakfast cafe ads in the morning).
Audience
In this step, you select exactly who you want to reach with your Facebook ad, which you can define based on:
- Location
- Age
- Gender
- Interests and behaviors
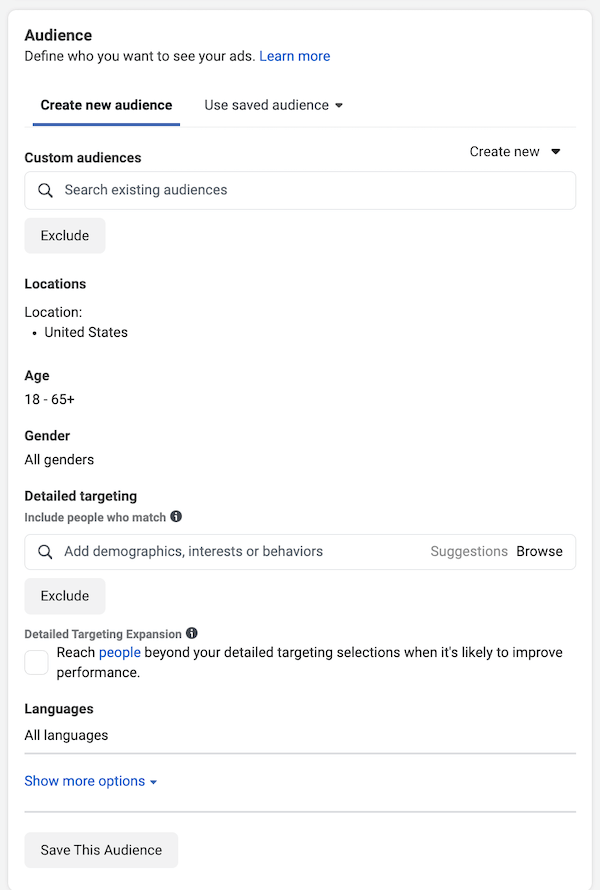
You can check out our full guide to Facebook ad targeting, but here’s a quick crash course:
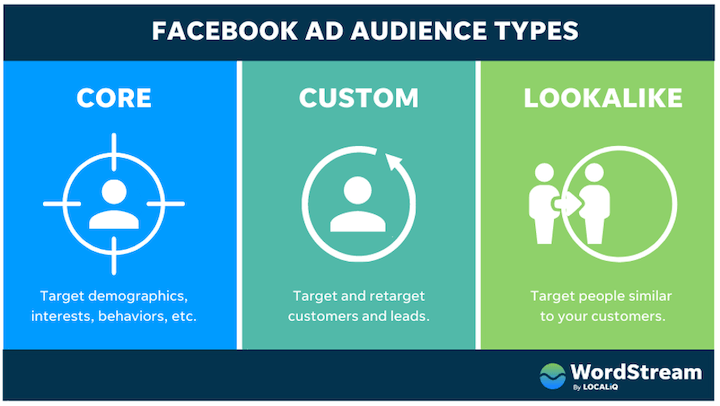
Though it has taken a bit of a hit due to privacy changes, Facebook’s targeting is still among the most powerful out there since users provide such detailed information about themselves on this platform—their age, marital status, job, interests, and more. There are three types of audiences you can target in Facebook ads.
- Core audiences: target users based on their demographics, interests, and behaviors.
- Custom audiences: target and retarget customers and leads. These are pixel-based.
- Lookalike audiences: target people similar to your existing customers and leads.
- For detailed targeting, you can create rules so that the ad targets users with one OR another or one AND another interest. Either way, it’s best to stick to just one or two interests or demographics per ad set. Otherwise you won’t know what audiences are working for you. If you have more interests to target, you can always create new ad sets.
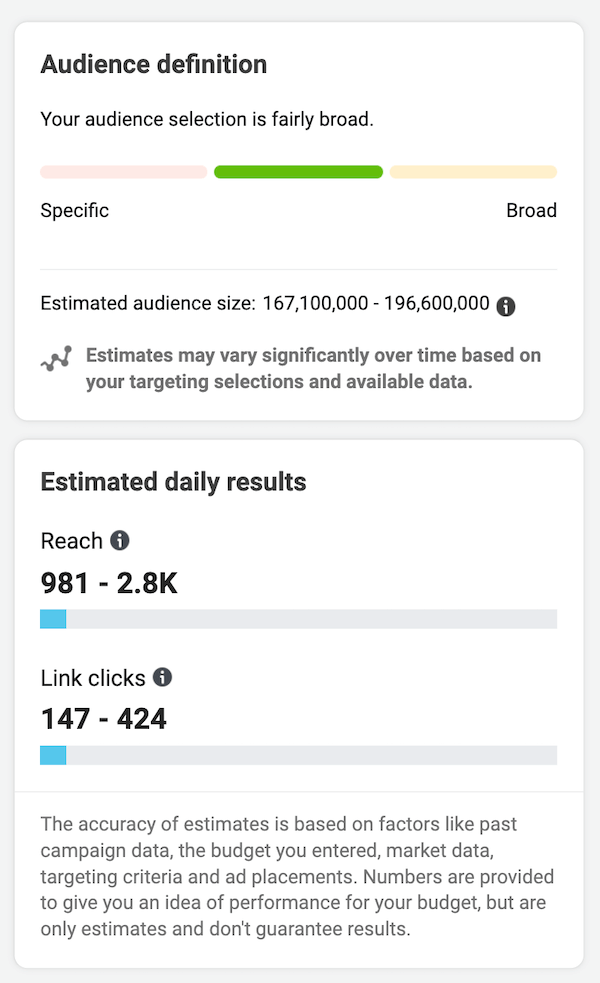
- On the right, Audience definition will tell you how large or small your audience will be based on the criteria chosen, and Estimated daily results will tell you how many people you’re estimated to reach based on your daily spend. Keep in mind that these are just estimates and aren’t always 100% reliable, so take them with a grain of salt.
Choose your placements
Now you’ll choose your placements. Placements refer to where your Facebook ad will appear on the Facebook network. Between mobile and desktop, Instagram and Facebook, there are a number of placements to choose from.
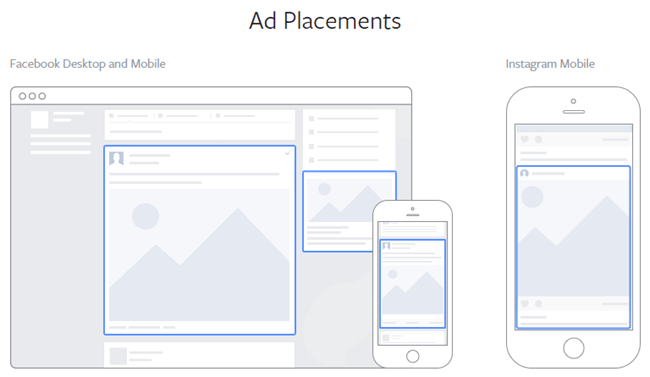
You’ll have two options here: automatic or manual. You may be tempted to manually choose which placements you want, but if you’re just starting out, it’s best to leave it on automatic and let your ad show on every possible placement to start. Then, after a week or two, you can look at which placements are performing best, switch to manual, and optimize your placements from there.
7. Create your ad
Now the fun part—creating your ad! The possibilities here are endless, but if you need a little inspiration, check out these Facebook ad examples.
Create your ad creative
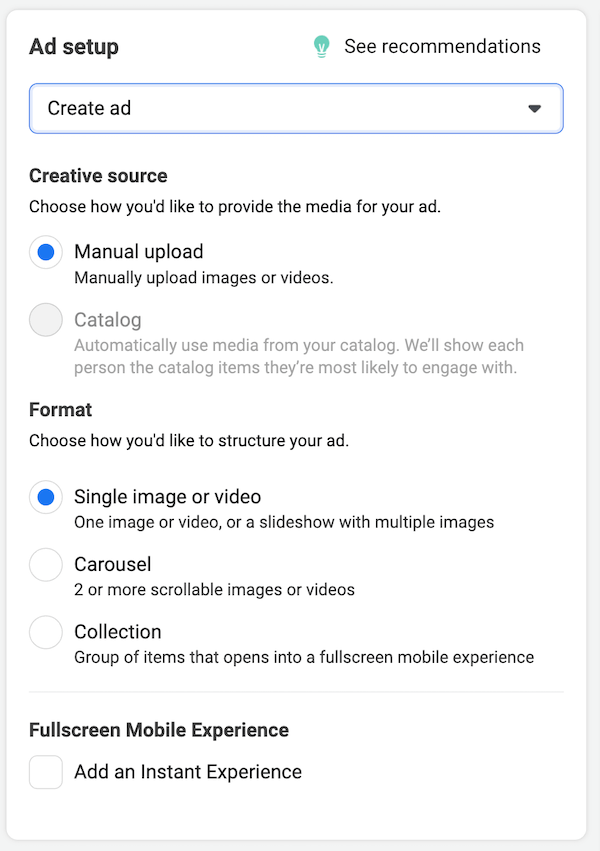
The creative refers to the visual part of your ad, and this should be the focal point of the ad. Facebook supports three ad formats: single image and video ads, carousel ads, and collection ads, and you have three creation options: use an existing post, a Creative hub mockup, or upload your own design.
The choice is entirely yours, and there are all kinds of free tools to design Facebook ads.
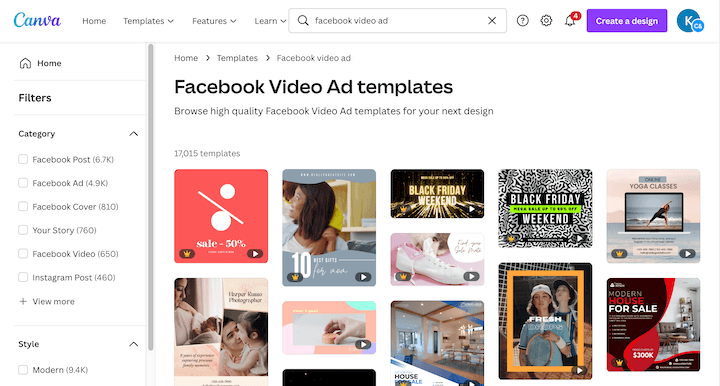
Facebook video ad templates in Canva.
Write your copy
Next it’s time for your ad copy, which consists of:
- Primary text: above the ad creative; only the first 125 characters show.
- Headline: just below the creative, 40 characters or less.
- Description: just below the headline, 30 characters or less.
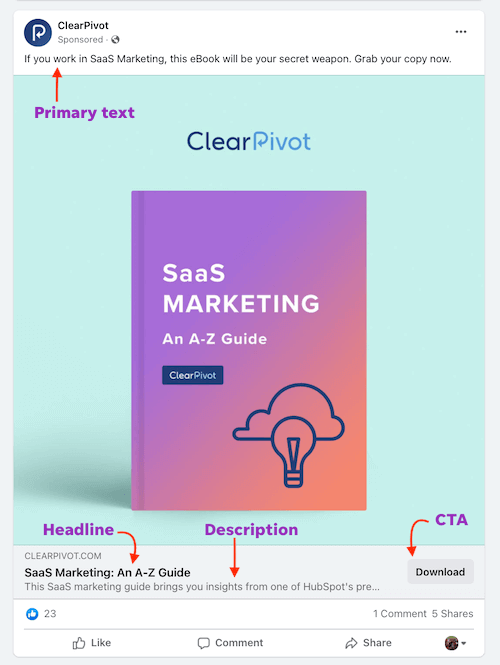
According to a study by AdEspresso, The perfect Facebook ad headline length is five words. In terms of sentiment, split test both positive and negative emotions in your headlines. By using the same targeting, but switching up the ad copy, you’ll be able to see which emotional appeal resonates best with your audience.
For more help with Facebook ad copy, we have a few resources to help you:
Choose your call to action
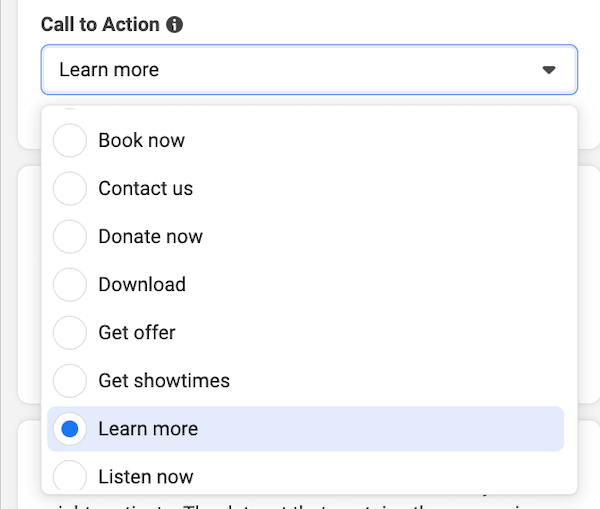
Once you enter your ad copy, enter your website URL and choose the call to action that makes the most sense for your offer. You can always A/B test this later!
Confirm your tracking
Last but definitely not least, make sure your website event tracking is set up (if you skipped it from earlier). You’ll have the option to set up app and offline events if applicable, as well as set a unique URL parameter so you can identify visitors to your website from this ad.
![]()
8. Publish!
That green button on the bottom right of your screen never looked so beautiful. Once you hit publish, an algorithm (and sometimes a person) will review for any Facebook Ad disapprovals, so your ad can take 24 hours (sometimes more) to get approved. Once it’s up and running, your ad will go through a learning period during which Facebook will gather the performance data it needs to optimize who it delivers the ad to and when.
To recap, here is how to run Facebook ads:
- Create a Business Suite account
- Connect or create your Facebook Page
- Create your ad account
- Add the pixel to your website
- Set up your web events
- Set up the pixel
- Verify your domain
- Configure your web events
- Create your Facebook ad campaign
- Choose your campaign objective
- Campaign settings
- Create your Facebook ad set
- Budget & schedule
- Audience
- Choose your placements
- Create your ad
- Create your ad creative
- Write your copy
- Hit publish
How to run Facebook ads: FAQs
Let’s close out with some answers to frequently asked questions about Facebook ads.
How does the Facebook ad auction work?
The Facebook ad auction works differently from the Google Ads auction. The key factors involved in determining who wins the Facebook Ads auction include:
- Your bid
- Your ad quality and relevance
- Your estimated action rates
These qualities ultimately determine your Facebook cost per click, which goes a long way in determining Facebook metrics that are tied more closely to revenue, like cost per action and cost per lead.
In order to make your ads as relevant as possible, make sure your audience is meticulously crafted, your Facebook ad creative and messaging resonates with said audience, and you’re rotating new ads in and out of your campaign periodically.
How much do Facebook ads cost?
Depending on industry, campaign objective, and other factors, the average Facebook cost per click can range anywhere from a quarter to $5. For a deeper dive, refer to our post on Facebook ad costs.
Use our free Facebook Ads Grader to make sure you’re not wasting any spend in your account.
How does Facebook remarketing work?
However, as pixel data is less reliable due to privacy, retargeting users based on their engagement with your business on Facebook itself is the way to go.
How should I structure my account?
Your Facebook Ads account structure should resemble a typical marketing funnel, with upper funnel campaigns devoted to prospecting, mid-funnel campaigns devoted to Facebook lookalike audiences and other audiences with mid-tier granularity, and lower-funnel campaigns devoted to highly refined Facebook remarketing audiences.
If you have the volume, you can also add broader Facebook lookalike audiences to your upper-funnel ad sets. And don’t forget to adjust your campaign objective based on the goal of each campaign. Your upper funnel campaigns should be geared toward driving awareness, getting clicks, and swelling your remarketing audiences, while your mid-and-lower-funnel audiences should be geared toward conversions (purchases, form fills, etc.).
Why aren’t my Facebook ads working?
Running into the snafu in which your Facebook ads aren’t working is one of the most common Facebook ad fails for advertisers. And, as such, it’s nothing to be embarrassed about. It happens to everybody. Some reasons your Facebook ads might not be working:
- Your campaign objective doesn’t match your goals.
- Your targeting is too broad.
- Your relevance score is too low.
- You’re lacking message match.
- Your ad creative is bland.
If your Facebook ads aren’t working for one of these reasons, don’t panic. Use the tips and resources in this article you will be back up and running in no time.



More Stories
Donkervoort F22 Is A Lightweight Missile
T-swift dominates the Billboard Hot 100
Links + Before + After Photos of My Brothers Bedroom Makeover!